You have bought your first MIG welder, however, how to trigger the optimal performance of this machine is still a tough question for you? Let your hair down as you are coming to the right page and I bet you will have your desired results. Why? Because this how to adjust a mig welder article will provide you with the rules as well as parameters that can be fixed in most cases.
Sounds fantastic! Go ahead!
Table of Contents
How To Adjust A Mig Welder?
The Voltage Adjustment
According to the welder operating principle, your MIG welder’s anodes are responsible for leading the direct current from the metal into the welding handle and come back to the cathode.
Hence, the deep penetrating on the material caused by the welding torch as well as the quality of the welding joints which completely depends on the voltage modification.
In case you can not find any paper of voltage instruction in your machine’s box. Don’t worry! Take it easy to weld and try to measure the intensity working of your welding torch. For instance, you can customize it by increasing the power a little bit if you see the welding area is melted languidly and vice versa.
For beginners, the medium power level is suitable for welding at first. You will get used to the minimum and maximum range later.
| Max amperage | Max thickness for bottom joints | Max thickness with V cap |
| 90 | 5/64 | 1/8 |
| 110 | 3/32 | 5/32 |
| 130 | 1/8 | 9/64 |
| 150 | 5/32 | 15/64 |
| 180 | 13/64 | 19/64 |
The Wire Feed Speed Adjustment
The wire speed modification controls the amperage together with how much and how fast the MIG welder feeds its wire into the welding joints.
If you feed with the high speed, you will hear the rapid sharp popping sound and again, you will hear the high pitch humming sound when you feed too low. The correct feed speed will sound smooth crackling.
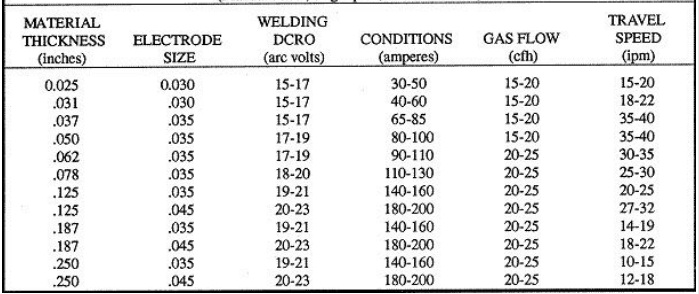
You can follow the following chart for adjustment and fix the parameters a little bit to fix your work. For example, you choose 0.23 inches, you have to multiply 3.5 inches/amp, then the wire feed speed equaled 437.4 ipm. The parameters in the following table is a good suggestion for you.
| For wire size | .023 in | .030 in | .035 in | .045 in |
| Multiply by | 3.5 in/amp | 2 in/amp | 1.6 in/amp | 1 in/amp |
The Gas Flow Rate
The gas flow regulates the perfect porosity on the surface of the weld area because it will protect this area from contaminants in the atmosphere.
The lower the gas flow rate is adjusted, the less gas is released to shielding. You had better have the average level of gas flow rate (not too high or too low) to avoid the turbulence in the welding area.
To ensure that you will have a correct gas flow rate, doing some tests before welding the real job can save your neck. The pressure is around 15-18 CFH which brings you the optimal results.
The Bottom Line
All information about the guides and the parameter charts for customizing the MIG welder is covered in this article. The more exact you adjust MIG welder, the more perfect you will have the final result. After reading this article, I hope you could clearly understand How To Adjust A MIG Welder. Thanks for reading!


Leave a Reply