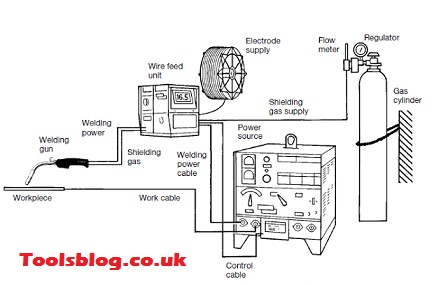
You’re wondering how to setup MIG welder? Is it too complicated to do it yourself? Well, for many beginners with no welding experience, it is widely believed that MIG welder is such a heavy-duty task that requires highly professional skills to perform it properly!
However, opposite to what people think, this welding method is quite simple to do even though you are just a beginner to welding! Just by following basic steps, you will be able to do the process yourself without any other’s help! Don’t you believe it? Let this article show you right now!
What is MIG welding?
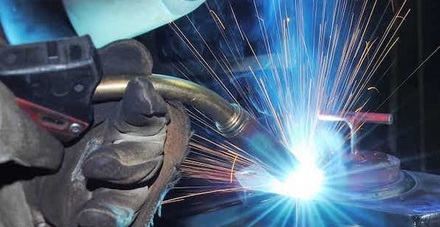
MIG welding is a method of welding that is commonly used in the industrial category nowadays! This method is particularly done by the use of a MIG wire electrode alongside a shielding gas, which is capable of melting and depositing the weld joint’s workpiece metal.
With the use of this shielding gas, your workpiece will be shielded from external contaminants lingering in the atmosphere! Besides this benefit, using this method also gives you a lot of advantages that will be listed below! Let’s figure them out right now!
What is MIG welding used for?
- Improve productivity: This method is able to increase your work productivity effectively! Moreover, the MIG welding is recommended to produce less mess on the work surface, compared to other methods! Therefore, it also helps reduce the cleaning time!
- Reduce the cost: MIG welding equipment, when compared to other methods, is less expensive and you can buy it at a price range of below $500! For small welding companies, this kind of equipment is also both money-saving and productive due to its wide range of applications!
- Easy to operate and set up: This process is quite simple that beginners can use and set up with ease within one or two weeks!
- High quality: Thanks to this shielding gas, your metal will be protected excellently from contamination in the air! Moreover, the welder can also adjust the wire feed voltage settings depending on their work requirements without any difficulty!
How to setup Mig Welder? Simple steps for Mig Welding
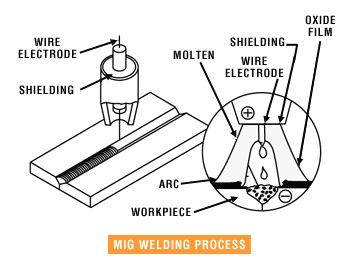
MIG welding process
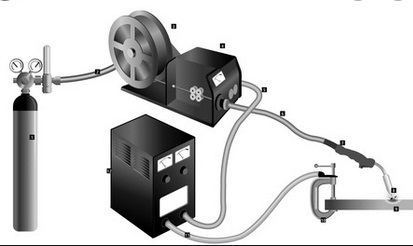
Before setting up MIG welder, take a look at these important things first:
- The welder usually requires a power source of over 80 amperes to operate. Therefore, before setup, check the power source to make sure it is proper!
- Prepare a bottle of the shielding gas and a gas regulator
- MIG welder machine
- Welding wire
- Ground clamps connected to the work area
- Welding gear includes mask, jacket, and gloves which are special-designed for welding
After this preparation phase, let’s start the welding process right now!
Step 1: Prepare the joint
Before starting up your welding machine, make certain that all the joints are set up properly because if there is any rust or oil remained on the work surface, your weld outcome will turn out poorly!
Don’t forget to clean the weld area carefully to eliminate all the dirt and rust! This important step will help improve the weld productivity but also avoid unexpected accidents caused by dirty joints during the welding process such as the fire!
Step 2: Choose the right kind of filler wire and gas
As major parts in the welding set-up, the gas and filler wire needs to be carefully chosen for the best outcome! Therefore, make sure you use the right kind of filler wire and gas for your weld machine!
Normally, if you are using the carbon steel, the ER70s electrode with C25 gas is an advisable choice! However, in case you use Aluminum for welding, you should use ER4043 with 100% Argon gas because it is more suitable!
Step 3: MIG welding set up
As the welding settings vary depending on the type of metal you are working with, for desired outputs, you should have correct settings before the process!
Particularly, when welding, the thickness of the metal is also taken into consideration as it has a significant impact on the settings, as well. Therefore, once it comes to MIG welding setup, there are three important settings that you will need to do to ensure they are compatible with your objects:
- Voltage setting
- Wire Feed Speed Setting
- Gas flow rate setting
Since every type of metal needs different settings, before the process, take a look at the thickness of your sheet metal to find out the most compatible voltage, wire feed speed, and gas flow rate for it!
On any welding machine, there is a manual with a detailed guide for setting the right voltage, wire feed speed, and gas flow rate for each kind of metal! If you are not clear about what you should do, this manual will be helpful for your references!
Step 4: Install MIG wire
After picking the suitable wire for welding, you will have to install it to begin the welding process. This installment process requires quite many steps so you should carefully apply them in the right order!
- Get the nozzle and contact tip removed
- Open the machine’s cabinet
- Unscrew the spindle’s cap, then put the wire spool into it gently
- Insert the MIG wire at the drive roll entry
- Ensure that the wire is straight and not bent
- Recap the wire spool
- To insert the wire through the welding gun, press the trigger
- Put back the contact tip and the nozzle
You have finished all the steps above? Well, that means you have succeeded in installing the MIG wire! And your welding process is ready to start right now! Be confident because you have been well-prepared for your perfect welding process and don’t forget one more important thing: stay safe and sound!
Final Thoughts
This is the wrap up of our welding guide today! Hopefully, after reading this article, you will find the informative advice helpful enough to help you with how to setup MIG welder! If you still have questions that you are unclear about, don’t hesitate to ask, as we are willing to give you a helping hand!
Leave a Reply